1. Why this post?
On this blog I have written about VPRN, VPLS, LDP and eBGP. The same words show up in all of them: label, LSP, PE, P, push, swap, pop. But I never had a post that explains what these are from the very beginning, calmly. This post is the first post of the “MPLS from Scratch” series. The goal: someone who reads this should be able to read the commands in the next posts by understanding the logic, not by memorizing them.
I give the command examples on Nokia SR OS. But the concepts I explain are exactly the same on Huawei, Cisco and Juniper. Only the commands change.
At the end of the post there is a ready-made lab that opens in your browser. You will see what you read with your own eyes there.
2. The problem: IP repeats the same work for every packet
In a normal IP network, when a packet sets off, every router on its path does this:
- Opens the packet’s IP header.
- Reads the destination IP address.
- Searches the routing table for the longest matching entry.
- Hands the packet to the outgoing interface it found.
This work is repeated on every router, for every packet. It’s not a problem while the table is small. But in a service provider core (especially if you carry the internet) the table grows to around a million entries, and every router in the core has to know all of them.
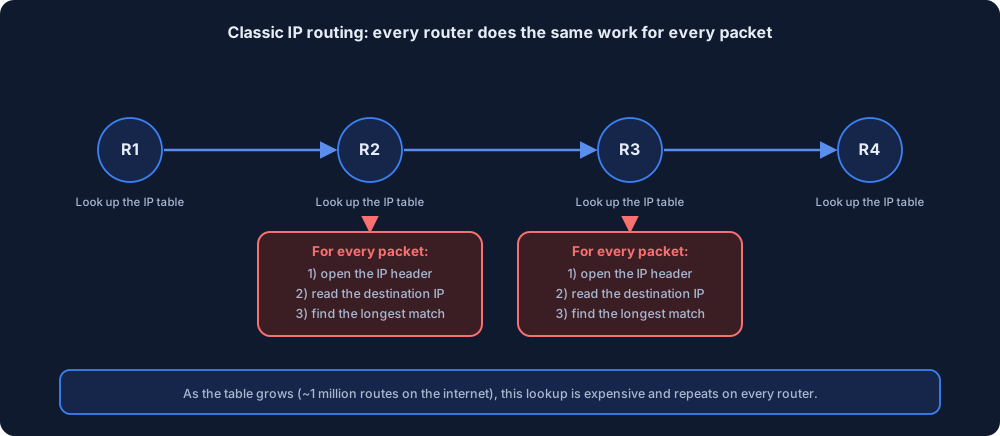
The idea of MPLS is: “Let’s do this work only once, at the edge of the network. The routers in the core shouldn’t look inside the packet, they should look at a small number on top of it.”
3. Analogy: the hospital queue ticket
The most common analogy for MPLS is cargo. I’ll use something different: a big hospital.
You walk into the hospital. The person at the information desk looks at your file: who you are, which department you’re going to. Then they give you a queue ticket: “number 17”.
Now you walk around the floors. The staff member on the first floor doesn’t open your file. They only look at the number on the ticket and read this from their own table: “number 17 → send to the 2nd floor, change the ticket to 42.” They change the ticket and send you on. The staff member on the second floor does the same: “number 42 → outpatient clinic, change the ticket to 9.”
At the clinic, the last staff member takes the ticket, and only then opens your file and tells you who your doctor is.
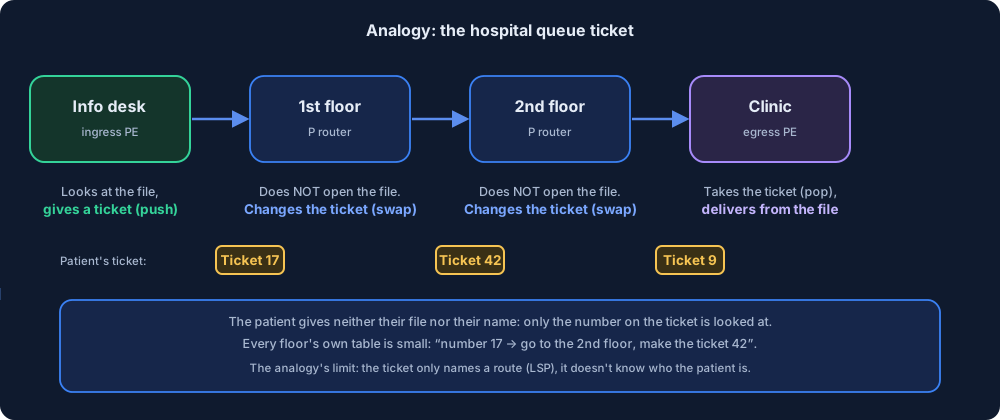
With this analogy we can match all the concepts of MPLS:
| Hospital | MPLS | What it does |
|---|---|---|
| Information desk | Ingress PE (entry) | Looks at the packet’s destination, attaches a label (push) |
| Floor staff | P router (transit) | Doesn’t open the file, changes the label (swap) |
| Outpatient clinic | Egress PE (exit) | Removes the label (pop), delivers the packet |
| Queue ticket | Label | The short number on the packet |
| File | IP packet | The actual payload, never opened in the core |
| The staff member’s small table | LFIB | “Incoming number → exit direction and new number” |
| The hospital’s ticketing system | LDP | How the floors agree on numbers |
The analogy has a limit too: the ticket only says which way to go, it doesn’t know who the patient is. Same in MPLS: the label decides which path the packet takes, it knows nothing about the contents.
4. What is a label, and where does it sit?
A label is a small 32-bit (4-byte) header added to the front of the packet. It goes between the Ethernet header and the IP header. That’s why MPLS is sometimes called “layer 2.5”: neither fully layer 2 nor fully layer 3.
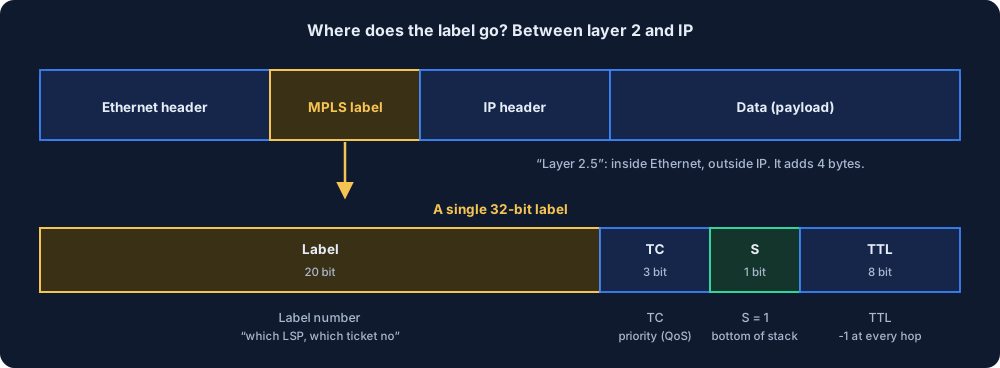
It has four fields:
| Field | Size | Meaning |
|---|---|---|
| Label | 20 bits | The actual number. About a million different values |
| TC | 3 bits | Traffic class, for QoS (it used to be called EXP) |
| S | 1 bit | “Bottom of stack.” 1 if there is a single label. If there are several, 1 on the last one |
| TTL | 8 bits | Like the TTL in IP, decreases by 1 at every hop. This is how traceroute works |
In practice you will mostly care about the Label field. We’ll see the S bit again when we talk about the two-label (VPN) structure.
A small note: on Nokia, dynamic (LDP-learned) labels are usually numbers in the 131000s. On Huawei you will mostly see small numbers starting from 1024. The numbers vary by vendor and device, the logic is the same.
5. Push, Swap, Pop: the packet’s journey
You already know the three operations from the analogy above. Now let’s follow a packet step by step in a four-router core (PE1 – P1 – P2 – PE2).
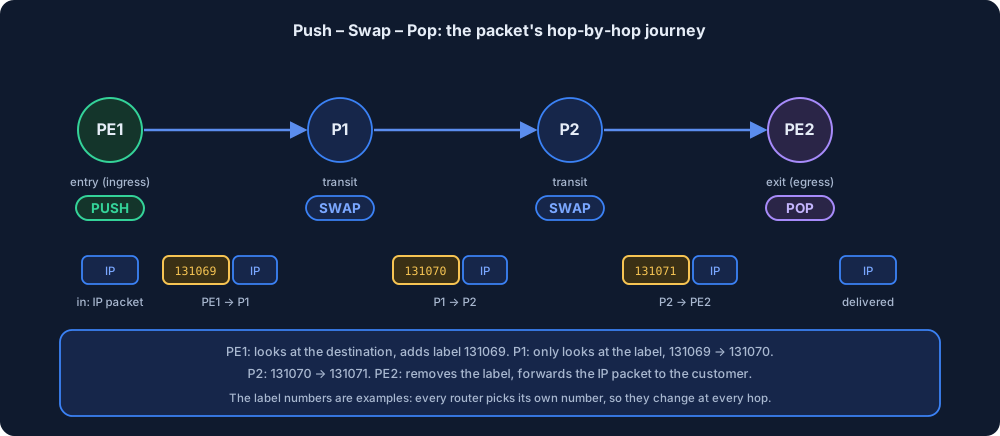
- PE1 (push): A plain IP packet arrives from the customer. PE1 looks at the destination address, finds the start of the labeled path (LSP) to that destination and attaches label 131069 to the packet.
- P1 (swap): Looks only at the label. Its table says “if 131069 comes in, write 131070 on the way out and give it to P2”. It doesn’t look at the IP address.
- P2 (swap): In the same way, turns 131070 into 131071.
- PE2 (pop): Removes the label. Now there is a plain IP packet, and it forwards it to the customer.
The critical difference here: P1 and P2 never saw the customer’s IP address. Their routing tables don’t need to be big, a few loopback addresses and labels are enough.
The label numbers in the diagram are examples. Every router picks its own label, so the numbers change hop by hop.
Bonus: PHP (penultimate hop popping)
On real devices there is a small fine-tuning. It’s not enough for PE2 to remove the label, it then also has to do an IP lookup (two jobs). So the second-to-last router (P2) removes the label in advance and hands PE2 a plain IP packet.
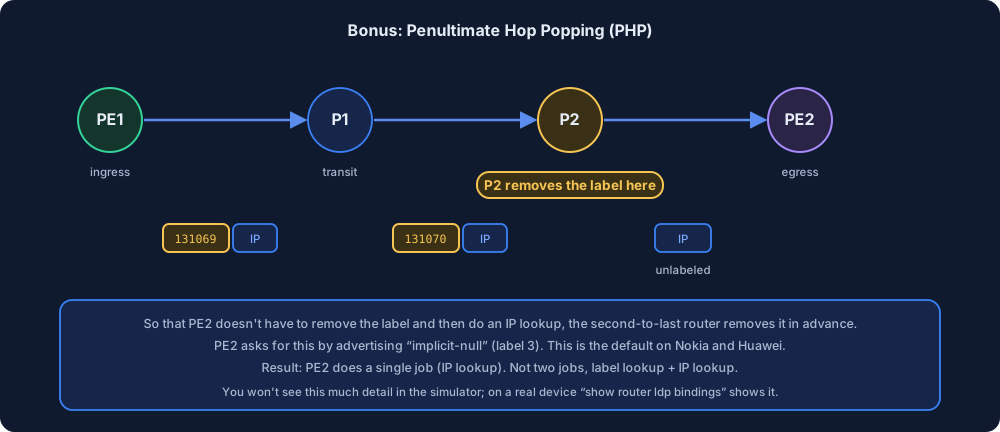
PE2 asks for this by advertising “implicit-null” (label 3). On Nokia and Huawei this is the default. It’s enough to know it to understand it, there’s no setting you need to make.
6. Roles: CE, PE and P
There are three kinds of routers in an MPLS network.
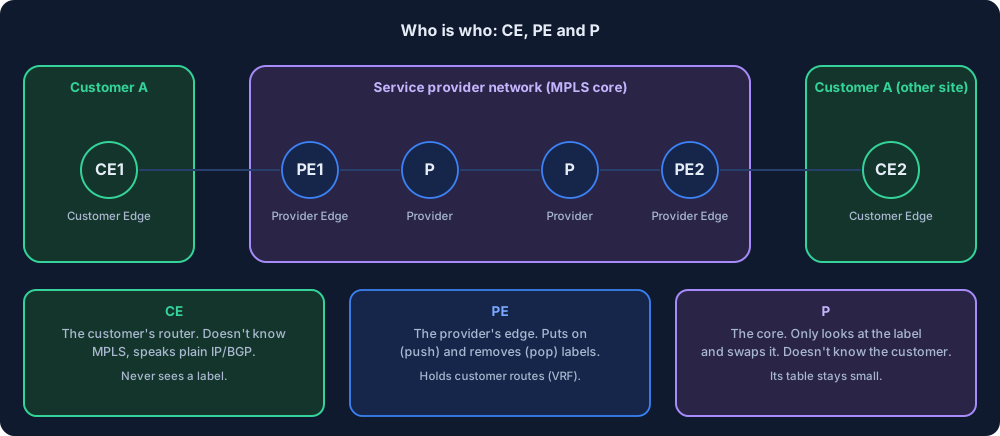
| Role | Stands for | Whose router | Knows MPLS? | What it does |
|---|---|---|---|---|
| CE | Customer Edge | Customer | No | Speaks plain IP or BGP. Never sees a label |
| PE | Provider Edge | Provider | Yes | Puts on and removes labels. Holds customer routes (VRF) |
| P | Provider | Provider | Yes | Only looks at the label and swaps it. Doesn’t know the customer |
The important result: all the “smart” work happens on the PEs. P routers are simple and fast. Whether you have 5 or 500 customers, the P routers’ tables don’t grow.
7. LSP: the labeled path, and it is one-way
The labeled path from PE1 to PE2 is called an LSP (Label Switched Path). In other words, it’s the name of the path that starts with a push, continues with swaps and ends with a pop.
The most commonly missed fact here: an LSP is one-way. There is one LSP from PE1 to PE2, and a separate LSP from PE2 to PE1. The two use different label numbers, and they can even take different physical paths.
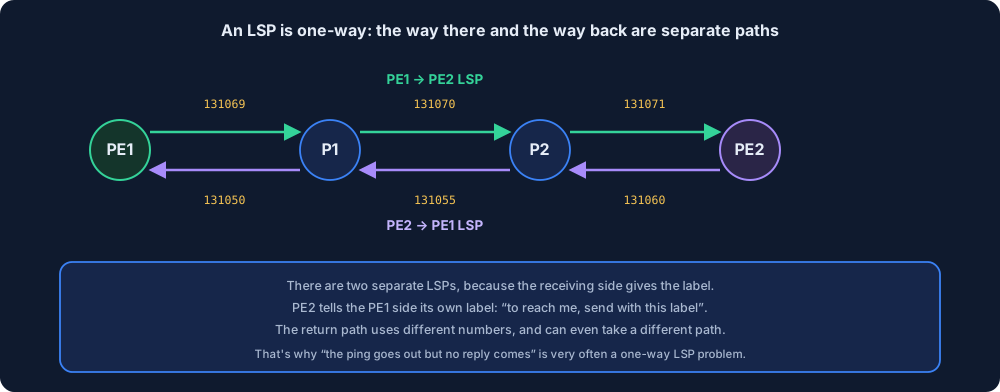
This fact is very useful when troubleshooting. When “the ping goes out but no reply comes back”, the place to look is very often the return LSP. I ran into an example of this in the PE–CE eBGP post: a “no LSP” warning was stopping all the traffic.
8. Who distributes the labels? LDP
So far we assumed the labels were known “somehow”. So how does P1 know which label P2 expects? Writing them by hand is possible (static LSP) but not feasible in a big network. LDP (Label Distribution Protocol) does the job.
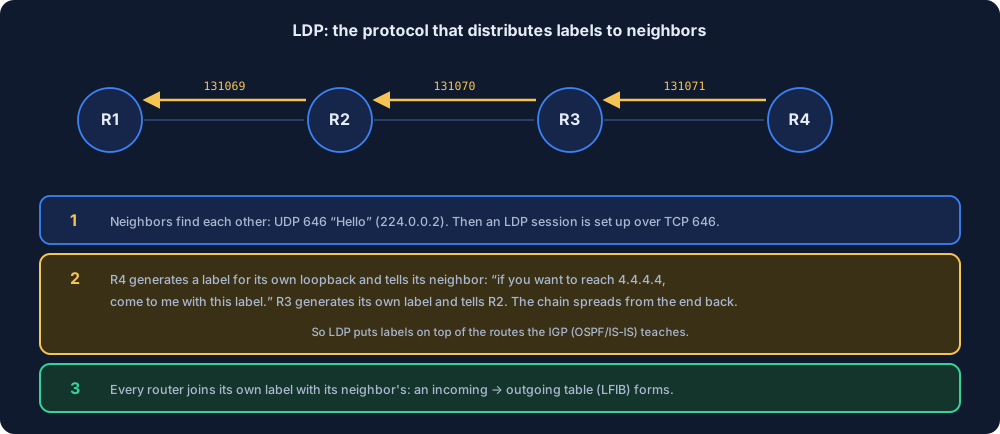
LDP works in three steps:
- Neighborship: Routers send “Hello” over the link with UDP 646 and find each other. Then they set up an LDP session over TCP 646.
- Label advertisement: Routers generate a label for each route (FEC) and tell their neighbor: “If you want to reach this address, come to me with this label.” The advertisement spreads from the destination toward the source. PE2 generates a label for its own loopback and tells P2, P2 generates its own label and tells P1, and so the chain reaches all the way to PE1.
- Table: Every router matches “the label my neighbor gave” with “the label I gave”. The result is the “incoming label → outgoing label + outgoing interface” table (LFIB).
Careful: LDP doesn’t find a path by itself. The IGP (OSPF or IS-IS) decides which path to take, LDP only puts labels on those routes. That’s why you set up the IGP first, then LDP. We saw this in the OSPF multi-area post.
9. Let’s see it on Nokia
Theory is nice, now let’s look at what a real device says. The core in the lab is four routers: R1 (PE) – R2 (P) – R3 (P) – R4 (PE). Each has OSPF and LDP set up. This is a summary of what’s done for the core-facing interfaces (example from R2):
configure router interface "system" address 2.2.2.2/32
configure router interface "toPE1" address 10.1.12.2/30
configure router interface "toPE1" port 1/1/1
configure router ospf area 0 interface "system" no shutdown
configure router ospf area 0 interface "toPE1" interface-type point-to-point
configure router ospf area 0 interface "toPE1" no shutdown
configure router ldp interface-parameters interface "toPE1" no shutdown
configure router ldp no shutdown
There are four things: the loopback (system), the IGP, the LDP interface and LDP itself. LDP is not enabled on customer-facing interfaces, there’s no point in giving labels to the customer.
On Huawei VRP the same job is done like this (the only difference is the command language):
mpls lsr-id 1.1.1.1
mpls
mpls ldp
interface GigabitEthernet0/0/0
 mpls
 mpls ldp
Which command shows what?
| Question | Nokia | Huawei |
|---|---|---|
| Is the LDP neighbor up? | show router ldp session | display mpls ldp session |
| Which labels exist? | show router ldp bindings active | display mpls ldp lsp |
| Which LSPs are ready? | show router tunnel-table | display mpls lsp |
| Trace the path | traceroute 4.4.4.4 | tracert 4.4.4.4 |
This is the output I saw when I ran these two commands on R1 in the lab:
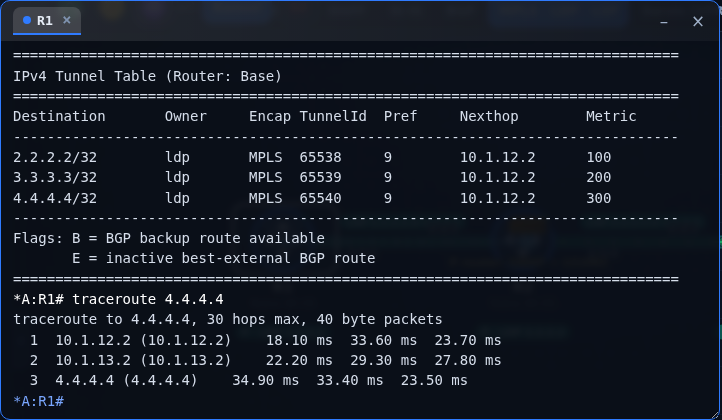
Look at the tunnel-table: R1 has three separate LSPs ready, to the loopbacks of R2, R3 and R4. The Owner column is ldp, meaning LDP distributed the labels for these paths. traceroute shows that PE to PE takes three hops: R2, R3, R4.
You can see the same thing on the map in the simulator’s MPLS tab:
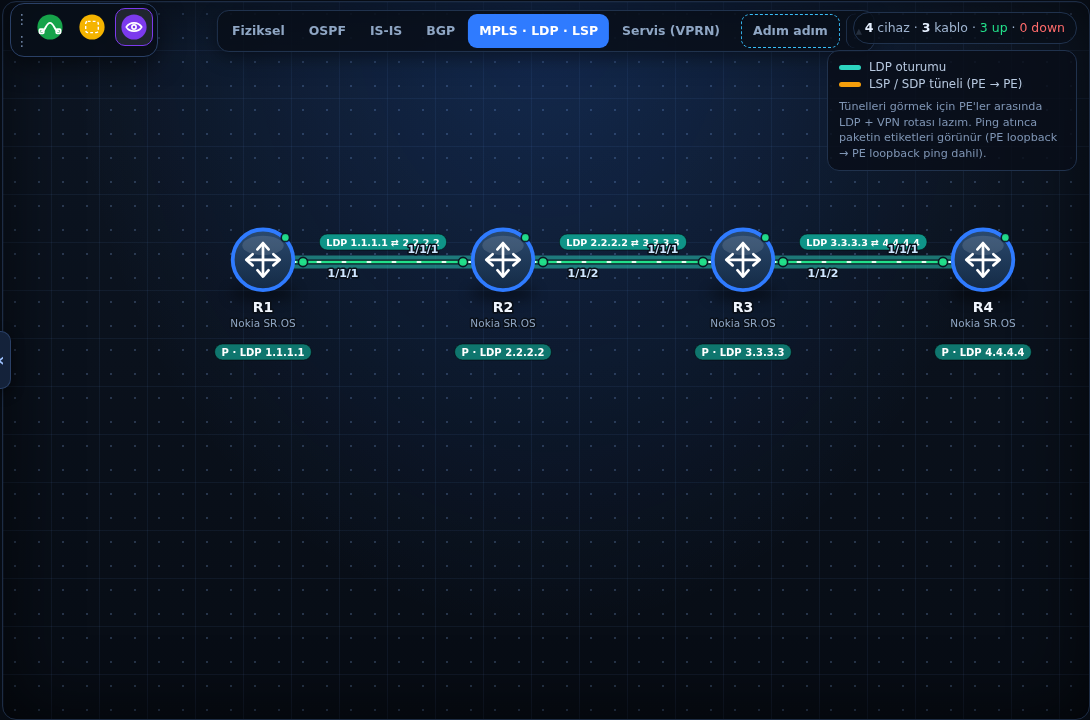
The green band on each link shows an LDP session. Three links, three sessions. A session alone isn’t enough, the labels also need to be distributed, and the bindings command tells you that.
See the label change hop by hop
Run this command on R2:
show router ldp bindings active
In the Op column you’ll see rows that say Push, Swap and Pop. These three words are the journey we drew in section 5, written in the device’s language. IngLbl is the incoming label, EgrLbl is the outgoing label. The numbers may be different in your own lab, that’s normal.
10. The second label: the door to the VPN
So far we have worked with a single label. In VPN services (VPRN, VPLS), two labels are attached to the packet.
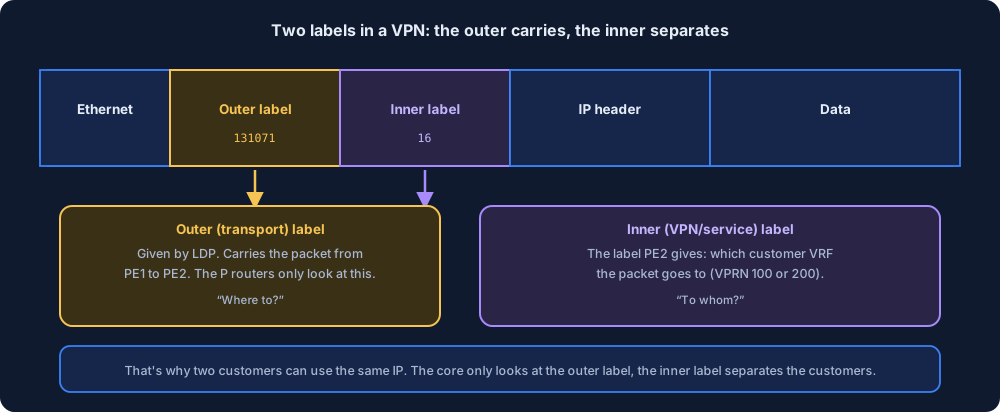
- Outer (transport) label: The label LDP gave. It carries the packet from PE1 to PE2. The P routers only look at this one. The question it answers: “Where to?”
- Inner (service) label: The label PE2 gave. When the packet arrives at PE2, it says which customer VRF (VPRN 100 or 200) it should go to. The question it answers: “To whom?”
That’s why two customers can use the same IP address. The core never sees it, what separates the customers is the inner label. We saw this hands-on in the two customers, same IP post. Now you know what I meant when I said “two-layer label” in that post.
11. What does MPLS give me?
Let’s go back to our problem from the first section. With labels we gain four things:
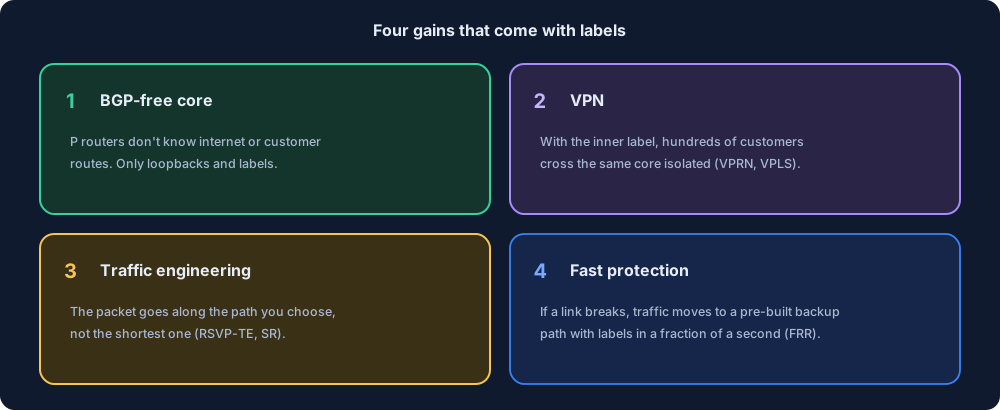
| Gain | What it means |
|---|---|
| BGP-free core | P routers don’t know internet or customer routes. Only loopbacks and labels |
| VPN | With the inner label, hundreds of customers cross the same core isolated from each other |
| Traffic engineering | The packet is sent along the path you choose, not the shortest one (RSVP-TE or Segment Routing) |
| Fast protection | If a link breaks, traffic moves to a pre-built backup path very quickly (FRR) |
All the next posts in this series explain a part of these four gains.
12. Frequently asked questions
Is MPLS a routing protocol? No. MPLS is a forwarding mechanism. Routing is done by the IGP and BGP, MPLS decides how the packet is carried across the core.
Does LDP replace OSPF? No. LDP puts labels on top of the routes OSPF teaches. LDP doesn’t work without OSPF (or IS-IS).
Does the CE router need to know MPLS? No. The CE is an ordinary IP router. You don’t make the customer set anything up.
Why don’t I need to memorize label numbers? Because every router picks its own number and can change it. What matters is not the number but the Push, Swap, Pop logic.
Can I see real label numbers in this simulator?
Yes, the show router ldp bindings active output works in the simulator too. The numbers may not be exactly the same as on a real device, but the logic and the output format are the same.
13. Summary
- The goal of MPLS: do the IP lookup only at the edge, keep the core fast and simple with labels.
- A label is a 32-bit header that sits between Ethernet and IP: Label, TC, S, TTL.
- Three operations: Push (attached at the PE), Swap (changed at the P), Pop (removed).
- An LSP is one-way, the way there and the way back are separate paths.
- PE is the smart edge (puts on/removes labels, holds customer routes), P is the simple core, CE is the customer router that doesn’t know MPLS.
- LDP distributes labels for the routes the IGP finds. IGP first, then LDP.
- In a VPN there are two labels: the outer one carries, the inner one separates customers.
You can find the core from this post ready-made on the Simulation page (Turkish UI): Yeni → Nokia → “MPLS temelleri: LDP ile etiketli yol”. If you choose “Konfigle aç” (open with config), R1–R4 come ready and you can look at the labels with show router ldp bindings active. If you choose “Sadece topoloji” (topology only), you get the same four routers cabled but empty, and you set up OSPF and LDP yourself.
In the next post I cover the IGP side with OSPF multi-area. For the whole series, see the MPLS from Scratch page (Turkish).